Tutorials
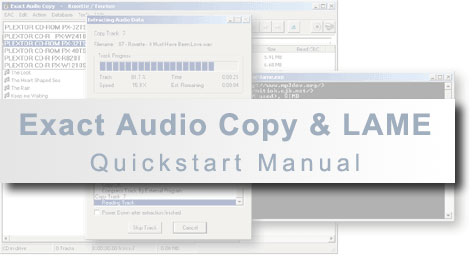
Exact Audio Copy (EAC) English Tutorial
For remarks, questions, fan or hatemail, contact
SatCP. However, since I have little time to answer mails it's better to ask questions at the Exact Audio Copy discussion board and Hydrogen Audio, and only contact me for comments about this manual.
This quickstart manual is also available in Dutch.
Table of contents
Introduction
Most of us know the phenomenon. You download some MP3 files and upon playing they appear to be full of ticks or is the bitrate awfully low. Usually the reason for this is the used software and/or configuration errors. We'll describe in a few paragraphs what you can do about that. If the theory cannot interest you, you can start right away with the quickstart manual.
It might be a good idea to print this manual on paper. Many do find it more pleasant to read from paper than from a display.
| Reading audio CDs... |
|---|
Exact Audio Copy (EAC) is known for many already as one of the best audio extracion programs. EAC was written by someone who got fed up with the dreadful quality of the extraction software by the time.
Using an advanced reading techique called secure mode, EAC is able to make quality guarantees other software can't. Contrary to other extraction software EAC reads every audio sector twice and compared to each other. Are both the same, then EAC knows there was no read error. Are both sectors different then EAC knows at least one sector was read incorrect. EAC reads the faulty sector again until it gets the correct data. The program may reread up to 82 times if necessary. Audio data can be recovered this way often where other programs would give up (if these already noticed the error). Of course EAC isn't a miracle drug and it is possible very well that even EAC can't recover the audio data. In this case EAC will report the exact location of the error in the log. After extraction completed you can listen to these suspicious positions in a few moments and decide whether or not there's an audible artifact (a read error does not automatically translate to an audible error). With other programs you can only guess where the read errors occured and listen to the whole cd to spot errors. That is of course if the software noticed errors...
Most bad MP3s you can find at Napster clones were ripped with software that does not indicate errors and the rippers did not prelisten the MP3s before releasing.
With EAC these kind of situations are impossible (unless something's wrong with your hardware). When EAC tells you no errors occured, there were none. If EAC tells errors did occur you know exactly where.
| Encoding audio to MP3... |
|---|
There are many MP3 encoders. Sadly the sound quality provided by these encoder is often quite bad. The very popular Xing encoder for example is known for its bad quality. Test like performed by r3mix.net (a must-read if you want to know more about MP3 facts and myths) showed there are 2 good MP3 encoders: LAME and Fraunhofer. Fraunhofer used to be the reference encoder for years and is known for the quality at lower bitrates. LAME on the other hand gained ground enormously during the past few years. LAME's strong part is the high bitrate quality and the variable bitrate (VBR) encoding. VBR was placed in bad daylight due to bad implementations in Xing and Fraunhofer. LAME is the first MP3 encoder to provide excellent VBR quality. The main advantage of VBR is that the bitrate is changed according to the complexity of the music. Complex parts in the music will make the encoder to use a higher bitrate and for less complex parts a lower bitrate. This gives the same quality as an MP3 file with constant bitrate (CBR) at a high bitrate, but for a much lower filesize.
An MP3 encoded with LAME VBR will have the size of an 160-200 kbit/s CBR MP3, but the quality of an 256-320 kbit/s MP3. 192 kbit/s has been the standard for CBR MP3 for years, but VBR provides a better audio quality for a comparable filesize. No need to mention VBR is gaining popularity quickly...
This short explanation for the people who are not experienced with audio extraction software and MP3 encoders.
The big disadvantage of EAC is the complexity of the program to new users. New users may be overwhelmed by features not even knowing what these are for. And too bad there's quite some configuring to set up EAC correctly...
EAC author Andre Wiethoff made an installer for the new EAC versions which guides you through the installation. Most settings are preconfigured for you so only a few trivial options need to be set! Getting EAC and LAME up and running is nowadays just a matter of minutes.
The quickstart manual
| ASPI? |
|---|
One of the most occuring problems with EAC is an absent, outdated or damaged ASPI layer. Windows 9x/ME come with an almost antique ASPI layer and Windows NT/2000/XP even come without an ASPI layer. The ASPI layer is a small piece of software that controls the communication between CD-ROM drives and Windows programs. An audio extractor like EAC of course can't work without it. It may be obvious that EAC needs a well working ASPI layer.
Head over to this page and download the ASPI check utility, a small program that checks your ASPI layer. If the program reports errors with the ASPI layer you can find an up to date ASPI layer on the same page. You must reboot after installation of the ASPI layer. It's adviced to use ASPI layer 4.60.1021.
If you experience problems with the ASPI layer and you use Windows NT, 2000 or XP, you can try the Native Win32 interface for Win NT & 2000 in EAC (from the EAC menu choose EAC Options and then go to the Interface tab). You must restart EAC for the changes to take effect.
| Installation of EAC and LAME |
|---|
First of all you need to download the latest versions of EAC and LAME. Download the latest version of Exact Audio Copy here (Exact Audio Copy 0.9 beta 4 at the moment of writing - download the EXE), and LAME here (LAME 3.92 at the moment of writing).
Before continuing make sure there is no CD inserted in your CD-ROM/DVD/writer.
The EAC installation is started by executing the downloaded file. Immediatly the EAC Installation Wizard shows up. Just always click Next unless you want to change something (path of installation for example). When the installation is completed you may start EAC for the first time. Now the EAC Setup Wizard pops up which will configure most things automatically for you. Click Next to start the wizard.
The first thing the wizard configures are the CD-ROM/CD-RW/DVD players EAC detected in your system. You can choose to configure not all drives, but while you're at it you better configure all drives (unless you are positive you won't use a certain drive).
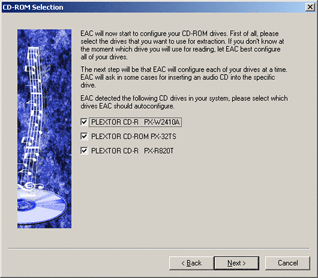
When clicking Next EAC starts the configuration of the selected drives. Make sure you always choose I prefer to have accurate results when EAC asks.

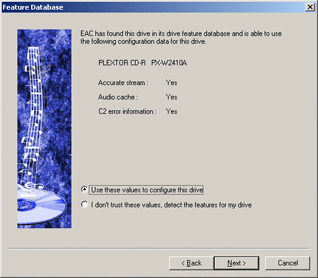
In most cases your drives will be recognized by EAC's internal drive database and EAC will set the most optimal settings. If you think EAC set the wrong options or your drive is not found in the database, then you can choose I don't
trust these values, detect the features for my drive. But that won't be necessary in most cases. EAC's drive database includes most popular drives. You can always verify the settings with the User Reported Drive Features Database.
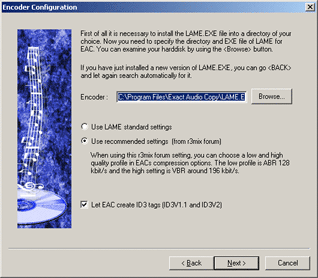
When all drives are set up correctly it's time for the LAME encoder. If you are not interested in ripping to MP3 you can of course skip this part. Before continuing you must install the LAME encoder. In theory it doesn't matter where you put the encoder, but the eAC installation directory is the best place and offers advantages (like the possibility to use LAME as a decoder too in EAC). Open the downloaded ZIP file (with a tool like WinZIP). You only need one file from the ZIP archive: LAME.EXE. Extract this file to the EAC installation path (default: C:\Program Files\Exact Audio Copy\). After that's done, click Next. EAC will now try to find the LAME executable by itself. If you can't wait for that you may wish to abort the search and enter the path manually.
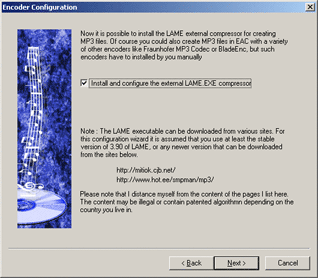
When EAC found the LAME MP3 encoder (or you entered the path) choose Use recommended settings (from r3mix forum). This setting uses the high quality --alt-preset standard command line for LAME. Before clicking Next verify the path to LAME is correct. It's possible when multiple versions of LAME are present on your harddisk that EAC is pointing to the wrong one.
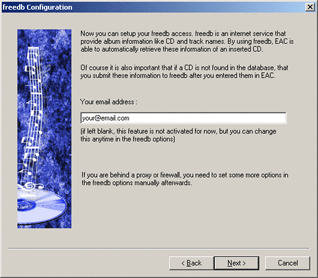
Next you have to enter an e-mail address. This may be a fake address, as long as it looks like an e-mail address. This e-mail address is necessary to get access to the Freedb database.
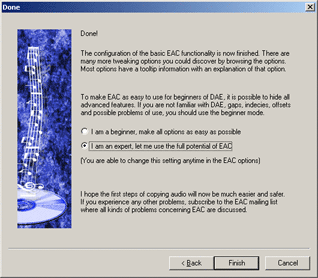
On the next screen EAC offers the selection between a beginner mode and an expert mode. In the beginner mode many options that might confuse new users are hidden. Although this may look interesting you should opt for I'm an expert, let me use the
full potential of EAC because some expert features are needed. Click Finish to end the wizard.
| Configuring the options |
|---|
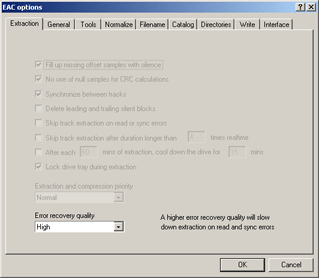
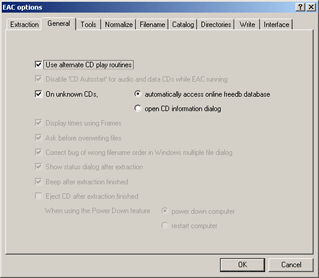
The preconfiguration is now completed, but still some options need to be set for correct functioning. From the EAC menu select EAC Options.... On the first tab (Extraction) change the Error recovery quality from Medium to High.
On the next tab General check following options:
Use alternate CD play routines: This setting makes EAC play audio CDs through digital audio extraction (DAE) instead of the analog output of the CD player. This of course only affects the prelistening, not the actual ripping which always uses DAE. With older CD-ROM players enabling this option may lead to stuttering playback. In that case, just disable this option again.On unknown CDs automatically access online freedb database: When you insert a CD in your drive EAC will automatically lookup the performer, album and track titles from the online freedb database. That saves you a lot of typing work if the CD is found in the online database. This option makes only sense if you have a permanent Internet connection like DSL or cable.
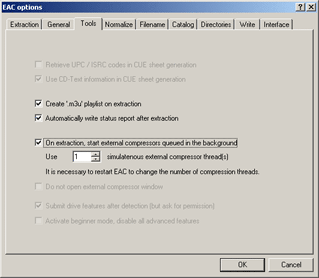
On the third tab Tools you also must set a few options:
Create '.m3u' playlist on extraction: This setting makes EAC generate playlists from the ripped CDs for use with a media player.Automatically write status report after extraction: Makes EAC write a status report (log file) after extraction in which you can find possible errors and the used settings. If you upload your music to other people it might be a good idea to provide the log file too so the downloaders can see whether or not it was a good rip. See it like some kind of quality guarantee.On extraction, start external compressors queued in the background: Normally EAC reads a track and then starts the LAME compressor. After LAME finished encoding the track EAC will start reading the next track and so on. By enabling this option EAC will start reading the next track already while LAME is compressing. This of course greatly improves extraction speed.
On the fifth tab Filename you'll notice an input field with the text: %T. EAC generates filenames using this string. The explanation of the % operators is given in EAC itself. For example, if you want to extract the song November Rain by Guns N' Roses from the CD Use Your Illusion I and use %D\%C\%N - %A - %T as Naming scheme, then the finename of the resulting MP3 file will be 10 - Guns N' Roses - November Rain.mp3 (the song is at number 10 on the CD). The MP3 will be placed in the folder ..\Guns N' Roses\Use Your Illusion I\, where .. indicates the folder where you made EAC write to.
You can experiment with the various combinations for the filename construction. If you want all tracks from all CDs to be extracted to the same folder you can use something like %A - %T.

Click OK to save the settings.
| Configuring Freedb |
|---|
To make EAC automatically lookup the CD's artist, album title and track titles the program must be able to connect to the Internet through HTTP. If your provider requires you to use a proxy server for surfing you must set the proxy server in EAC.
From the EAC menu choose freedb / Database options... and check the option Use Proxy Server for HTTP access. Enter the proxy server's name or address in the Proxy Server input field. For Telenet customers for example that's proxy.pandora.be. Port is the port of the server (for example 8080). Authentification is usually not required. Contact your ISP when in doubt.
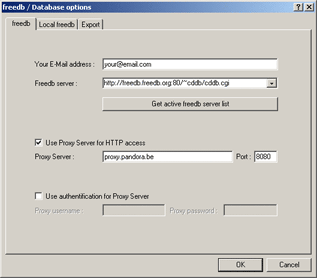
Click OK to save the settings.
| Controlling or setting the LAME MP3 encoder options |
|---|
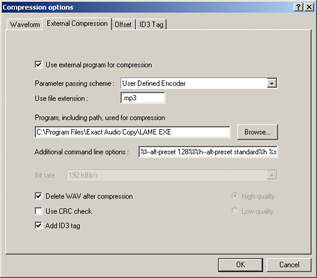
From the EAC menu select Compression Options.... On the second tab External Comression you can find the settings for external compressors (like LAME) in EAC.
During the installation of EAC you had to choose the quality setting for LAME: r3mix. Although the name might give the impression that the r3mix setting uses the --r3mix command line that's not the case. EAC uses the --alt-preset standard command line (which is developed by audio experts on the r3mix forum). This setting is nowadays considered as the standard for high quality MP3 compression. If you are satisfied with this setting you can skip the following part. Below a few alternative command lines for LAME are discussed.
Often you'll see people ripping at 192 kbit/s - especially people within the MP3 scene. 192 kbit/s is the classic trade off between filesize and quality and it's accepted as standard in the MP3 scene. This bitrate gives a good sound quality, but not yet archival quality. It's a shame the MP3 scene is holding on on such an old standard. The --alt-preset standard setting gives better quality for a comparable filesize. Is diskspace no concern for you then you can opt for 256 kbit/s and if you only accept the best there's --alt-preset insane. This last setting gives 320 kbit/s MP3s. Not really suitable for Internet distribution!
On the External Compression tab enter one of following command lines in the Additional
command line options input field:
- VBR (very good quality):
--r3mix %s %d(Internet distribution) - VBR (extreme good quality):
--alt-preset standard %s %d(Internet distribution - Recommended) - VBR (best quality for VBR):
--alt-preset extreme %s %d(Internet distribution, archiving) - CBR (good quality):
--alt-preset cbr 192 %s %d(Internet distribution, mp3 scene releases) - CBR (very good quality):
--alt-preset cbr 256 %s %d(Internet distribution, archiving) - CBR (best quality for MP3):
--alt-preset insane %s %d(Archiving)
The --alt-preset extreme command line gives the best quality for variable bitrate MP3s. However, the difference with --alt-preset standard is inaudible to most people and the bitrate is 30 kbit/s average higher. Therefore --alt-preset standard is the best option if you share your MP3s on the Internet.
Now what's the use of the %s and %d parameters in the command lines? They were not present in older versions of EAC and are nowhere described in the LAME manual. The %s and %d stand for source and destination file respectively. Since we use the User Defined Encoder Parameter passing scheme in EAC instead of the LAME MP Encoder, it's necessary for EAC to know where LAME accepts the source and destination file in the command line. If you select LAME MP Encoder from the Parameter passing scheme dropdown box you may omit the %s and %d.
The default command-line after installation looks even more weird: %l--alt-preset 128%l%h--alt-preset standard%h %s %d. However, this translates to --alt-preset standard. For an explanation of the %l and %h parameters read the EAC documentation and you'll see why.
For the rest you don't have to change anything in this screen. The default bitrate of 192 kbit/s in the dropdown box is ignored when you use the above command lines.
Click OK to save the settings.
| Controlling or setting the drive options |
|---|
Often ignored, but one of the most important parts of the EAC configuration. A faulty drive confguration makes EAC sensitive to errors and working unreliable.
Select Drive Options... from the EAC menu. Click the warning dialog box away. The options you now see on the Extraction Method tab are the real power of EAC. An incorrect setting may make the extraction unreliable, though. Thus check whether EAC is using the correct settings. Secure Mode *must* be enabled! If that is the case you can go to the next chapter.
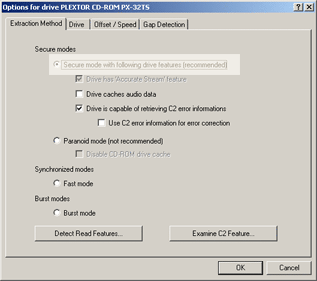
If you think EAC is using incorrect settings or the drive was not found in EAC's internal database, you can still do the drive configuration by hand. Insert a CD in the drive you want to configure (and make sure it's selected from the drive dropdown box on the top left of the EAC main window).
Click the Detect Read Features... button. EAC will now try to detect the correct settings for your drive. This can take up to ten minutes depending on the drive, but is usually done within a minute. Once EAC detected the settings click Apply (and *not* OK!!). EAC will ask whether it may submit the detected information to the EAC database (online). You are not obliged to do that, but only with your help the EAC database can grow larger so more and more drives are automatically detected. No personal information is submitted, only the model of CD-ROM drive and the detected settings. Submitting can take a few moments. Be patient :)
You now return to the Drive Options dialog. Verify that EAC is now using the found settings. Secure Mode *must* be enabled!
On the next tab Drive click the Autodetect read command now button. After a few seconds EAC returns the correct read command for your drive.
And those were the most important options of EAC for a correct functioning. For a more detailed explanation over these and the other options in EAC read the EAC Tutorials. Please note that these are somewhat outdated, but still very valuable.
Click OK to save the settings.
Using EAC & LAME
Insert the CD you want to rip in your CD-ROM and wait for EAC to request the CD information in the online freedb database (if enabled). Verify the titles because the information is sent in by volunteers to freedb and often contains typos. If you want to capitalize every first letter: Database -> Transform Actual CD Information -> Upper All First Characters.
For a Various Artists CD there are a few strict naming rules. The track title in EAC should look like Track Artist / Track Title. If that is not true, the ersulting MP3s will have faulty ID3 tags which is very annoying. Constructions like Track Artist - Track Title and Track Title / Track Artist are not allowed and will result into faulty filenames and or ID3 tags! In the menu Database -> Transform Actual CD Information you can find a few tools to quickly correct these mistakes. Also the option Various artists must be checked on the toolbar or in Database -> Edit CD Information. You can find more detailed information about this in the EAC Tutorials: Entering CD Information.
| Ripping an audio CD to separate MP3 tracks |
|---|
This is the most common used extraction method. But sometimes it's desirable to extract the whole CD as one big track. More about that later.
Select all tracks (or only the wanted tracks) in the main window of EAC and choose from the Action menu Copy Selected Tracks -> Compressed..., or press key combination Shift+F5, or click the MP3 icon in the left vertical toolbar. EAC will now ask where you want the MP3s to be stored on your harddisk. Browse to the desired location and click Save.
If you want to extract to uncompressed WAV files instead of MP3, choose from the Action menu Copy Selected Tracks -> Uncompressed..., or press key F5, or click the WAV icon in the left vertical toolbar.
And the rest is done automatically by EAC. EAC will now start reading the CD. If suddenly some kind of DOS box pops up, no panic. That's the LAME encoder kicking in.
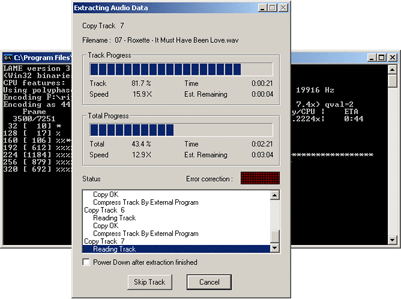
During extraction you'll sometimes notice red dots lighting up in the extraction dialog window and after the extraction completed you get a log with things like Peak Level and Track Quality. If you want to know what all that means, read Extracting Tracks from the EAC Tutorial.
When a Read Error or Sync Error occurs, there's an uncorrectable error in the read audio data. After extraction you'll get a list of the exact locations of the suspicious positions. Again, more information about that can be found in the EAC Tutorials: Extracting Tracks.
| Ripping an audio CD to an MP3 image + CUE sheet |
|---|
With mix or live CDs it's advisable to rip the whole CD to one big track. This because the framesize of MP3 is different from the framesize of an audio CD and because the first samples of an MP3 file are always incorrect. That makes there's a short silence and a small part missing between two MP3 files. For regular CDs this is not much of a problem because tracks start and end with silence, but live and mix CDs have applause or music on the track transitions. This almost always leads to an audible tick on the transition when you burn the MP3s to CD. The solution is ripping to one MP3, an image. If you downloaded such an image you can still split it to separate MP3s if wanted using a tool like MusiCutter.
Ripping an audio CD to an MP3 image + CUE sheet (the CUE sheet contains the track positions) is as easy as ripping to separate tracks. From the Action menu select Copy Image & Create CUE Sheet -> Compressed.... You cannot use key combination Alt+F7 or the IMG (image) icon in the left vertical toolbar: these extract to an uncompressed WAV file.
EAC will first do a gap detection. If this seems to take forever (like 10 minutes) you have to change the gap detection options. More information about that in Configuring Gap Detection from the EAC Tutorials.
© Copyright 2002, SatCP