|
CONFIGURING EAC OPTIONS
First we will set some general options for EAC which should be the same for most
users. Start Exact Audio Copy and from The EAC menu select EAC
Options... or press F9.
This opens the EAC options dialog box. After seeing the
amount of options available in EAC most new users hook off, but this is actually
the easiest part of the EAC setup. Once you know the meaning of the settings
setting the correct values is a breeze. This page will help you with that by
giving detailed information about every setting and recommended settings. While
this page may look overwhelming you can set the EAC options in a few
minutes with it. Non
relevant options for a basic working EAC installation are grayed out, but will
be discussed later in this tutorial when they become important. Important
features have red exclamation signs !! and
may affect sound quality if not set properly. |
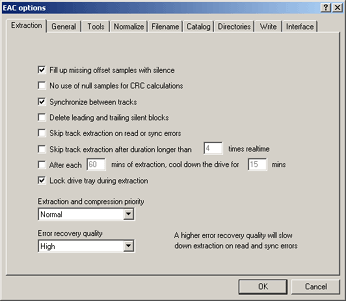
Explanation of the settings on the Extraction tab:
 |
Fill up missing offset samples with silence: (Default: Enabled, Recommended:
Enabled) When using offset
correction (see later), without the drive being able to overread into lead-in/lead-out, this flag specifies if the missing samples should be filled with silence to maintain the
correct track length or just left out, resulting in a WAV file with missing some samples.
Since we want to get extraction results as close to the original as possible
enable this option.
No use of null samples for CRC calculations: (Default: Enabled, Recommended:
Disabled) When calculating CRC checksums, null samples are not counted. Otherwise also a
shift will result in a different CRC even if the track has null samples at the beginning and the
end. This option isn't really important and has absolutely no influence on the
extraction quality. However, for people who want to experiment with offsets it
may be interesting to disable this option.
Synchronize between tracks !!: (Default: Enabled, Recommended: Enabled) At track junctions EAC is able to do a
jitter/synchronize correction between the two tracks, making it sure that no pops/gaps will occur on these junctions. This works of course only if adjacent tracks are extracted.
Enable this option.
Delete leading and trailing silent blocks: (Default: Disabled, Recommended:
Disabled) If a track (or range) contains silence at the beginning and/or the end, EAC
can remove these (only blockwise). Of course this will result in a WAV that is shorter than the original track.
Since we want 100% copies leave this option disabled.
Skip track extraction on read or sync errors: (Default: Disabled, Recommended:
Disabled) If selected, EAC will, on the first occurrence of a read or sync error, skip the actual track and proceed with the next one.
It's recommended to leave this option disabled. Thanks to EAC's advanced
extraction method tracks with read and/or sync errors often have no audible
artifacts. When such an error occurs, EAC will display it in the log file so you
can listen to the suspicious position and decide for yourself whether or not you
can hear an artifact. When a read or sync error occurred the extraction is no
longer guaranteed to be accurate, but it's in my opinion better to have a copy
with a few wrong samples you cannot hear, than no copy at all... Of course, EAC
can't do miracles so it is possible that artifacts are introduced due to read
and/or sync errors on badly scratched CDs. It's up to you to decide whether or
not you can hear the artifacts.
Skip track extraction after duration longer than: (Default: Disabled, Recommended:
Disabled) If selected, EAC will, after extracting a given time on a track, skip the actual track and proceed with the next one. This is handy if error correction takes too long, making error-free extraction nearly unfeasible.
On the other hand you sometimes want to give a badly damaged track a try in
which case the extraction process can take up to several hours. Then it's of
course better to leave this option disabled! Some of you may think that it's
stupid to leave this options disabled because if a track takes that long it
contains that much errors it probably is no longer a "pleasure for the
ear". However, examples are known of people extracting CDs which took over
15 hours to complete with only a few audible artifacts and those could be easily
removed in a wave editor.
After each xx mins of extraction, cool down the drive for yy mins: (Default:
Disabled) On difficult, error-full extractions it is often a good idea to pause the extraction within a specific time interval, in order to prevent any damage of the CD-ROM drive.
EAC's advanced reading method causes a lot more movement of the laser unit what
may cause excessive heat production with certain CD-ROMs. The heat may decrease
reading performance so if you experience problems during long extractions it may
be a good idea to enable this option. Otherwise leave it disabled.
Lock drive tray during extraction: (Default: Enabled, Recommended:
Enabled) EAC will lock the CD-ROM drive tray to make sure that the user don't open it by accident during the extraction process. If not selected, the tray would open during an extraction, but leaving EAC in an unknown state.
Enable this option to avoid problems.
Extraction and compression priority: (Default: Normal, Recommended:
Normal) Just leave this setting alone.
Increasing priority will make other applications work "choppy".
Error recovery quality !!: (Default: Medium, Recommended: High) There are three levels of error correction, also visible in the number of error-display rows in the extraction dialog. This only specifies how many rereads will be done before giving up.
Since we want the highest possible quality for
our extracted tracks set this to "High".
|
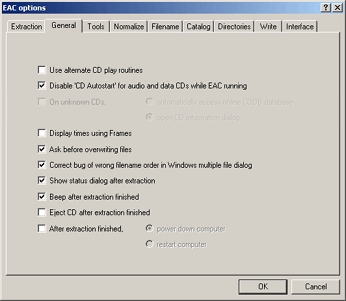
Explanation of the settings on the General tab:
 |
Use alternate CD play routines: (Default: Disabled) Normally EAC will play (not extract of
course) through the analog output of the CD-ROM and soundcard. When this option
is enabled all CD play routines will work by extracting and digitally sending the audio data to the sound card. This has the advantage that no cable has to be installed between the drive and the soundcard.
This is especially
cool in Windows 2000 where other programs can also do this by setting this in
Device Manager. Note that this feature is only recommended if you have a CD-ROM
that is quite good in Digital Audio Extraction.
Disable 'CD Autostart' for audio and data CDs while EAC running: (Default: Enabled, Recommended:
Enabled) EAC will disable Windows CD autostart feature in order all times a new CD is inserted to not have pop up either the Windows
CD player or start the setup program of the CD. Enable
this so autorun cannot disturb EAC.
Display time using frames: (Default: Disabled, Recommended:
Disabled) It is possible to display the time information in the main window in two different formats, either as
1/100 seconds or as 1/75 seconds (frames) which is more native to the CD. The frame display is always exact while hundredth of seconds will be rounded.
1 second = 75 frames. Most people will prefer the 1/100 seconds format so leave
this option disabled.
Ask before overwriting files: (Default: Enabled, Recommended:
Enabled) If a track with the specific filename on the CD already exists, EAC is able to either ask if the file really should be overwritten or just overwrite without asking.
Enabling this option can save you a lot of troubles.
Correct bug of wrong filename order in Windows multiple file dialog: (Default: Enabled, Recommended:
Enabled) The Windows file selection box has some strange behavior that occurs when selecting multiple files, the first and last track will be exchanged. This occurs when clicking the last file of the list as the last one. This function will correct this and exchange both files again.
Show status dialog after extraction: (Default: Enabled, Recommended:
Enabled) Here you could select if EAC should show up the Extraction Status dialog
after extraction. The status
dialog will show error messages occurred during extraction and will report track
quality and suspicious positions. This MUST be enabled.
Beep after extraction finished: (Default: Enabled, Recommended:
Enabled) After extraction is finished EAC is able to perform a Windows Beep.
Eject CD after extraction finished: (Default: Disabled, Recommended:
Disabled) Makes the CD eject after extraction
finished just like some CD-R burning applications do. If you have a lot of CDs
to extract this may be handy for lazy people ;)
After extraction finished - Power down computer: (Default: Disabled, Recommended:
Disabled) If selected, EAC will power down the computer after an extraction has finished.
May be useful when you try to extract a CD that
takes hours due to reading errors and you want to bed...
After extraction finished - Restart computer: (Default: Disabled, Recommended:
Disabled) Same as above, but in this case EAC will reset the computer in order to start up new for a clean environment.
|
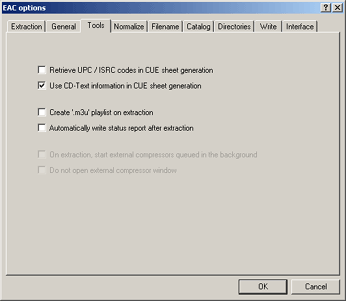
Explanation of the settings on the Tools tab:
 |
Retrieve UPC/ISRC codes in CUE sheet generation: (Default: Disabled, Recommended:
Disabled) On automatically generating a CUE sheet for a CD, it is possible to add also its UPC and ISRCs. These codes identify products and
manufacturers. This is usually only required for professional CD mastering. Codes
are assigned on a country-by-country basis. In practice only few CDs seem to
effective use this information and retrieving could be quite time consuming on some CDs.
Disable.
Use CD-Text information in CUE sheet generation: Add PERFORMER and TITLE to CUE sheets that are created. If the program and writer supports CD-Text these
information will be written automatically to the CD. This information is taken from the main window and from the CD Informations dialog.
If you plan to use EAC in conjunction with CDRWin or the EAC
write function to copy
audio CDs and your writer supports CD-TEXT enable this. See below for an example
of a CUE sheet with and without CD-TEXT information.
Create '.m3u' playlist on extraction: (Default: Disabled, Recommended:
Disabled) If selected, EAC will automatically write an '.m3u' playlist to the
chosen directory, name is generated from the CD name. Only tracks selected for extraction will be listed in this file.
This may be a handy option if you extract to MP3s. Then EAC will automatically
create WinAMP playlists for the extracted CDs.
Automatically write status report after extraction: (Default: Disabled, Recommended:
Disabled) After extraction has been finished it is possible to automatically save the status
information to a file, the name will be generated from the CD title. Not really
an important feature, but some people prefer to save the logs of an extracted
CD.
|
This is what a CUE sheet
looks like with and without CD-TEXT information:
With CD-TEXT
informationPERFORMER "Guns N' Roses"
TITLE "Use Your Illusion II"
FILE "K:\Range.wav" WAVE
TRACK 01 AUDIO
TITLE "Civil War"
PERFORMER "Guns N' Roses"
INDEX 01 00:00:00
TRACK 02 AUDIO
TITLE "14 Years"
PERFORMER "Guns N' Roses"
INDEX 00 07:40:60
INDEX 01 07:42:35 |
Without CD-TEXT
informationFILE "K:\Range.wav" WAVE
TRACK 01 AUDIO
INDEX 01 00:00:00
TRACK 02 AUDIO
INDEX 00 07:40:60
INDEX 01 07:42:35 |
|
Explanation of the settings on the Normalize tab:
Normalize !!: (Default: Disabled, Recommended:
Disabled) Normalizing a track means to change its volume to a given maximum loudness, 100% means that the song (in the file) will be as loud as possible (without clipping) (0 dB) and 25% means that the volume will be only a fourth of the maximum possible loudness (-12 dB). This could be handy to bring all songs of a compilation to the same maximum loudness, but could also destroy the intended effect (dynamics) created by a composer.
However,
there's a serious drawback: normalized tracks are no longer 100% the same as the
original because of rounding. For example assume values 0, 1, 2 and 3. Assuming
3 is 100% (audio is 16 bit but we'll use 2 bit to make the effect more clear),
normalizing to 50% would result in 0, 0.5, 1 and 1,5. Since we are using 2 bit
resolution the floating point values are impossible and must be rounded what
leads to 0, 1, 1, 2 what is in no way half the original signal! While our
example with 2 bit resolution has only 4 values, audio has 16 bit resolution and
thus 65536 different values. The effect of normalizing isn't audible (though
some "claim" they can hear it... my answer; prove it :)
Also you don't want to normalize CDs that have no pauses between the tracks
because each track will get a different volume.
Normalize to: (Default: 98%) This is the level of normalization, 100% is maximum value. Usually for maximum loudness a few percent lower value is taken to prevent clipping by the output devices.
But only, if Peak Level is smaller than: (Default: 85%) Here you can choose for what tracks normalization should be done. It should be done if a track has a low maximum volume. All tracks with a volume below this value will be normalized.
But only, if Peak Level is greater than: (Default: 99%) Here you can choose for what tracks normalization should be done. It should be done if a track has an extreme high maximum volume. All tracks with a volume higher than this value will be normalized.
If you use normalizing the default value is 98% and it is recommended to use
that value. Also "But only if peak level is smaller than 85% or greater
than 99%" is used in most other programs too. This will speed up extraction
a lot as not all tracks have to be normalized since most have peak values
between 85% and 99%. Also there isn't that much difference in loudness between
85% and 99%.
|
Explanation of the settings on the Filename
tab:
Construction of save filenames: (Default: %T) In this field you can select how the filename of an extracted track is
constructed. By choosing placeholders for properties of the CD you could create any filename you want. Of course you
can also write text normally, and you can specify a '\' to tell that it should be in a subdirectory. If the subdirectory does not exists, it will be created. There is a limitation that you can't specify an absolute position (e.g. 'C:\directory\%T' or '\%T').
There are quite a lot tags you can use. A few examples are given below.
Replace spaces by underscores: (Default: Disabled, Recommended: Disabled)
If selected, all spaces in filenames that are created will be replaced by underscores ('_'). "Artist - Track01.wav" would turn into "Artist_-_Track01.wav".
|
Save filenames examples:
%A - %T

Artist - Track01.wav
Artist - Track02.wav
Artist - Track03.wav |
%A\%C\(%N) %T
Artist\CD Title\
|
(01) Track01.wav
(02) Track02.wav
(03) Track03.wav
|
|
|
Explanation of the settings on the Directories
tab:
Here you can set to use a default directory for saving the tracks or the last
used directory.
Ask every time (default showing last used directory): (Default: Enabled, Recommended: Enabled) If this is selected, EAC will ask always for the destination directory of all extractions.
Use this directory: (Default: Disabled, Recommended: Disabled) You can specify a directory to where all extractions are targeted.
|
Explanation of the settings on the Interface
tab:
Here you can select the SCSI interface. Always use "Installed external
ASPI interface", also if you use NT or 2000. There's a bug in the
"Native Win32 interface for Win NT & 2000".
Installed external
ASPI interface: (Default: Enabled, Recommended: Enabled) An external SCSI/IDE interface, called ASPI, will be used. For best compatibility you should use the one from Adaptec.
Obtain the Adaptec ASPI layer.
Native Win32 interface for Win NT & 2000: (Default: Disabled, Recommended:
Disabled) The SCSI/IDE interface used will be the one provided by EAC. This works only for Windows NT and Windows 2000, but it could result in some problems because bugs could occur anytime.
|
|
Click OK to save the settings. EAC itself is now configured for basic use.
As you may have noticed see we have forgotten a few tabs. No worries though,
these tabs are not important at this point and will be discussed later where
they become important.
It's a good idea to close Exact Audio Copy at this point. Exact Audio Copy saves
it's settings to the registry on shutdown so if the program crashes or locks up
during one of the next configuration steps you don't lose all your settings.
The next step is the configuration of the drive(s) used for extraction. That
step is one of the most important because if you don't do it properly the
extraction process will not give accurate results.
|
|