|
DETERMINING THE OFFSETS PART I
If you want to make a 100% duplicate of an audio CD you must use offset
correction. If you don't know what exactly offsets are and what influence they
have on the extraction, make sure you read The
Truth About Offsets. Actually everyone should read it, because there's a lot
of misinformation about offsets confusing people. On this page you can read that
there are 2 ways to correct the offset issue:
The second method is preferred as this is the only one that gives no missing
samples (again, read The Truth About Offsets
for in depth information about this issue). Another advantage of the separate read
offset correction and write offset correction is that the
tracks extracted to the harddisk are also offset corrected, while when using the
combined read/write offset correction only the burnt target
disc is offset corrected - the tracks on the harddisk still have an offset!
So when do you have to use the combined read/write offset correction
then? Currently Exact Audio Copy is the only software available that can use the
separate write offset correction. Thus if your burner is not
supported by EAC for writing you have to use alternate writing software like
CDRWin, Feurio! or Nero, and are not able to use the separate read
offset correction and write offset correction to make
perfect duplicates of CDs. In this case you'll have to use the combined
read/write offset correction. Some users may not like the EAC write feature
and prefer their favorite recording program to record the tracks to CD. They
have to use the combined read/write offset correction too.
Thus the conclusion is that when you do not record to CD with EAC you must use
the combined read/write offset correction. In all other cases
it's recommended to use the separate read offset correction
and write offset correction.
The drawback of using the combined read/write offset correction
is when you use EAC to extract tracks to your harddisk that those tracks will
not be offset corrected. In other words, when you extract tracks to your
harddisk, not meant for CD recording but MP3 encoding for example you'll want to
use the separate read offset correction and write
offset correction too make sure that the tracks on your harddisk are also
offset corrected. Thus this means that you sometimes will have to switch between
using the combined read/write offset correction and the read
offset correction. Users also writing CDs with EAC don't have this problem
since they use the separate read offset correction and write
offset correction all the time.
On the other hand some users will not be able to determine the separate read offset correction and write
offset correction for their drives, even when writing with Exact Audio
Copy. In this case they also have to use the combined read/write offset correction.
Not yet confused? Well then, let's start!
Determining the read offset
About reference CDs:
Determining the real read offset of a drive is very
difficult, but Andre Wiethoff (EAC) managed to determine the offset for the
Plextor UltraPlex 32TS. Once a single drive's offset was known Andre used this
drive to create the reference CD list included in Exact Audio Copy. If you own a
CD from this list, it is possible to determine the read offset
in just a few mouse
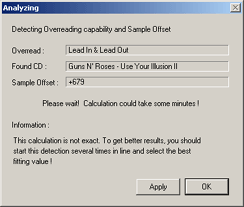
clicks. EAC will compare a small range of audio data extracted from your CD with
the reference data included in EAC. From this EAC calculates the read offset
of your drive.
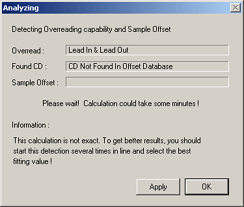
Of course this only works if you own CDs on the EAC reference CD list. Each
new version of EAC contains more new reference CDs so the chances become bigger
that you or someone you know owns such reference CDs. View
the current list of included reference CDs (scroll down a little on that
page).
Excellent you'd think, but too bad a problem raises. It seems that different
pressings of CDs sometimes also have an offset to each other! Thus you may
perform the read offset detection and get a wrong result while you used the same CD
as included on the EAC reference CD list. Therefore you should also check the
CD's ID code which can be found on the inner ring of the CD. See the two examples
below:
|
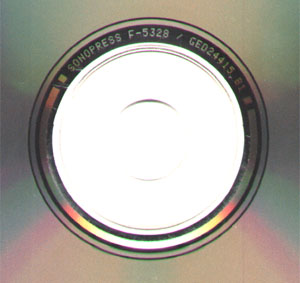
Guns N' Roses - Use Your Illusion I
ID code: SONOPRESS F-5328 / GED24415 B1 |
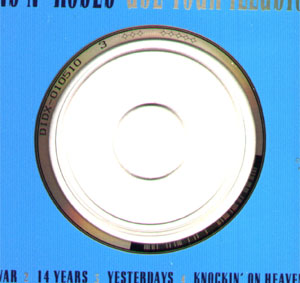
Guns N' Roses - Use Your Illusion II
ID code: DIDX-010510 3 |
When you lookup those CDs in the current list of included reference CDs
you'll see that the ID codes match. Sometimes CDs with a different ID code still
have the same offset as the reference CD, sometimes the offset between the CD
you have and the original reference CD is that much that it is no longer
recognized as a reference CD, but what's worse... sometimes CDs with the same ID
code have a different offset. Thus the ID code is just for reference, it does
not guarantee correct read offset detection.
Therefore read offset detections performed with only 1 reference CD are not
reliable. You should at least use 2 different reference CDs and get at least 2
times the same read offset.
For example, you may have 5 CDs included on the reference list, but only 2
out of those give the same read offset. If all CDs give a
different read offset you'll have to look
for more reference CDs as you still can't be sure about the detected read offset.
If 3 or more CDs give the same read offset you don't have to worry, you have found
the correct read offset!
Although it should be obvious I'll mention it anyway: The read offset
detection
must be performed on original pressed CDs! Copies are not suitable and may give
incorrect results.
Thus as you can see, determining the read offset comes
down to finding the correct reference CDs.
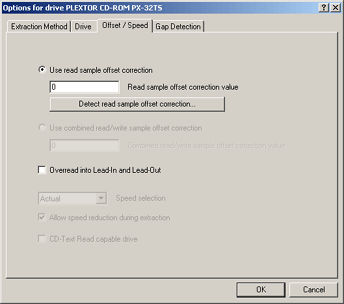
Performing the offset detection:
Now you know what you should look for, it's time to explain how to perform
the read offset detection. Insert a reference CD in your drive. Select the device you want to use for
extraction in the top left drop down box. This is in most cases your
CD-ROM. If you want to use multiple devices you'll have to repeat all steps
for each device you want to use.
|