|
roozster.info > Exact Audio Copy |
|
|
|
|

http://roozster.info/eac/
|
|
EXTRACTING TRACKS
Extracting tracks to your harddisk is easy with Exact Audio Copy. Basically
you just select the tracks and start the extraction. Of course it is important
that you have correctly Configured The EAC Options
and done the EAC Drive Configuration properly.
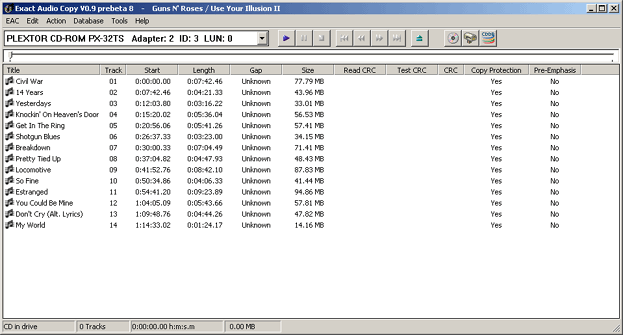
Insert an audio CD and wait for the CD-ROM to initialize it.
It may be interesting to enter track names for each track instead of the standard track names
EAC uses. Read Entering CD Information to find out how
to automatically lookup CD artist and track title information in the online CDDB
or manually enter it. Once that's done the EAC main screen should display the CD
information:
Prelistening the tracks
You not always want to extract every track, and often you don't know each
track on a CD, thus you'll probably want to prelisten some tracks. If no tracks
are selected you can use the the CD player buttons on the toolbar to listen
to the CD as you would with a normal CD player. On the right you can see a
description of each CD player button on the toolbar, but most of you will be
familiar with the symbols and don't have a problem with that.
You can also first select some tracks and then use the CD player buttons. In
this case EAC will only play the selected tracks which may be handy to verify
that you really selected the correct tracks right before extraction. Especially
handy for those people who use EAC's default Track01, Track02, Track03,...
track names.
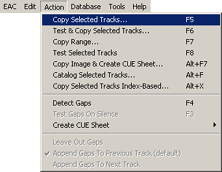
Extracting the tracks
Select the tracks you wish to extract. Selecting tracks works similar as
selecting files in Windows Explorer. Thus use the Shift and Control
keys to select multiple tracks. If you select no tracks at all, EAC will select
all tracks automatically when you start extraction. Once that's done you are
ready for extraction. Choose Action -> Copy Selected Tracks...
from the menu or pres F5. Exact Audio Copy now shows a Save
Waveform dialog box. No need to enter a file name. EAC will take care of
that. Just browse to the location you want to save the tracks and click the Save
button.
|
|
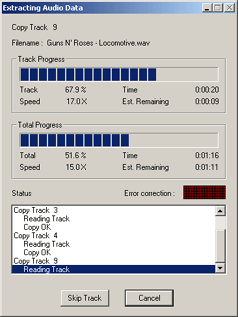
Unless things are going awful wrong the extraction process should now start.
Exact Audio copy displays extraction monitoring data and progress status in the Extracting
Audio Data dialog box as shown on the left.
On the top of this dialog box is displayed which track is currently being
extracted. Track Progress shows the status of the current extracting
track. Time is the time already elapsed and Est.
Time is the estimated time left for the track to finish extraction. Total Progress shows the same information as Track
Progress but for the overall extraction process. The Error correction field shows the number of rereads EAC
is performing. More information about how to interpret this follows alter on
this page. The Status field shows additional extraction information
like possible read errors.
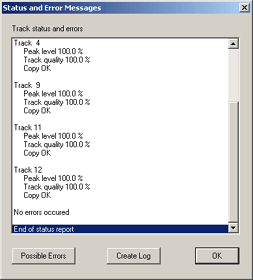
After extraction completed click the OK button. This will
show the Status and Error Messages dialog box (right image). The CD we used as extraction example did not contain any errors as you can
see in the Status and Error Messages dialog box. All tracks
were extracted correct!
Some explanation of the information displayed in the Status and Error Messages
log. Peak level is the loudest peak in the extracted track.
Though the example screenshot has all peak levels at 100%, the maximum volume,
this is not necessary true for all CDs. Some CDs (especially older ones) are
recorded a lot softer. Thus if the Peak level shows a low
percentage for certain tracks, don't worry. This does not mean that Exact Audio
Copy was not able to extract the tracks 100% correct!!
While Peak level tells nothing about the quality of
extraction, Track quality does. A Track quality
of 100% obviously means that the track was extracted 100% correct. But here's
where some people make mistakes; sometimes EAC rereads certain audio sectors
multiple times to get accurate extraction results. For every reread EAC does,
the Track quality decreases, but this does not mean that the
extraction is less accurate. It is possible to have a bit-by-bit perfect copy of
a track, while Track quality is lower than 100%. As long as
Exact Audio Copy does not report any errors in the Status and Error Messages log, the extracted files are bit-by-bit perfect copies of the original. Track
quality should be interpreted as the physical quality of the CD and not of
the extracted data. A CD with some scratches or dirty fingers on will certainly
cause rereads in EAC and thus a Track quality lower than
100%, but still the extracted tracks may be perfect. Thus if the log says Copy
OK for a track that means it's extracted perfect - no matter of the Track
quality. So, I hope that made things more clear as many people are confused
by the Track quality.
Click the OK button to close the Status and Error Messages dialog.
|
|
In case of read errors
Sometimes you'll have to extract CDs with scratches. As we've seen before
Exact Audio Copy reads every sector twice or uses C2 error information retrieval
to detect read errors. If one is detected EAC takes action by rereading the
audio sector 16 times. If the 50% of the rereads returns the same sector
data the chances are minimal that these samples are wrong, and EAC will use those samples and continue. If after 16 rereads no satisfying
result is returned, EAC will do another series of 16 rereads. This up to 5 times
thus resulting into a maximum of no less than 80 rereads before giving up and
displaying a read error. This rereading information is displayed in the Error correction
gauge on the Extracting
Audio Data dialog window, so let's take a closer look at it.
|
|
On the left the Error correction
gauge is displayed in its initial status. If you look good (because it's
somewhat vague) you see that the gauge is a raster of 5 rows of each 16 dark red
blocks. Each block represents a reread.
|
|
When a read error is detected EAC starts to reread and this is shown
by bright red blocks in the raster. In the example on the left you can see that
the first series of 16 rereads did not return the correct sector and thus it
starts a second series.
|
|
Continuing on the previous example we'll assume that EAC managed to
read the correct sector information after 2 series of rereads. Even when EAC
starts reading the following sectors, the maximum number of needed rereads stays
displayed in the Error correction
gauge as (darker) red blocks so you always can see how many rereads a CD
required.
|
|
After extraction finished the Extracting
Audio Data dialog box should look similar to the screenshot on the left. As
you can see no more than 2 series of rereads were needed to read the whole
track. Click the OK button. Now the Status and Error Messages dialog
window (right image) shows up. As you can see due to the rereads the Track quality
is only 97.3%, but since Exact Audio Copy also reports Copy
OK you can rest assured that the track was extracted bit-by-bit perfect.
|
|
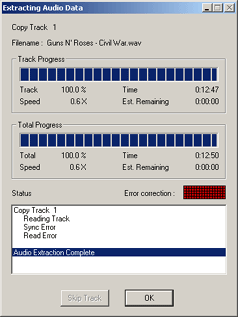
Of course EAC isn't a miracle drug, so it's not unreal that a sector cannot be
read correct even after 5 series of 16 rereads. In this case EAC gives up, and
reports the sector as a suspicious position.
|
|
As you can see on the left screenshot of the Extracting
Audio Data dialog box, Exact Audio Copy now reports a Sync Error.
If the next sector can also not be retrieved a Read Error is
displayed.
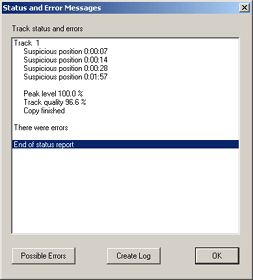
After clicking OK when the extraction finished you can
see the status report in the Status and Error Messages dialog
window (right screenshot). New is the There were errors
warning what means the extracted track may not be a bit-by-bit perfect copy
anymore. It's in theory possible that even with read errors the extracted track
is still a 100% perfect copy, but in practice you can be sure the extracted
track contains errors. That does not mean there are audible artifacts in the
extracted track!
|
|
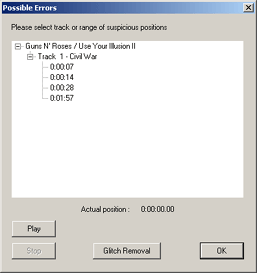
Click the Possible Errors button on the bottom of the Status and Error Messages dialog
window. This opens the Possible Errors dialog box.
All suspicious positions
per track are displayed here. Just select a suspicious position
in the list and click the Play button. Exact Audio Copy plays
the part of the track EAC reported errors in. You can then listen to those
positions and decide whether or not you can hear artifacts.
The example track on the left has 4 suspicious positions,
but no audible neither a visual (checked in a wave editor) artifact could be
detected. Thus even while some samples may be incorrect, it still sounds
perfect.
If you hear artifacts like plops or cracks in the sound you may wish to use
the Glitch Removal tool, but this tool may also remove stuff
that looks like artifacts but is part of the music.
Click OK to return to the Status and Error Messages dialog.
|
|
|
|